Setting up Facebook ads might sound complicated, but it’s pretty straightforward once you get the hang of it. In this guide, I’ll walk you through the steps in a way that’s easy to understand, even if you’re new to it. Let’s get started!
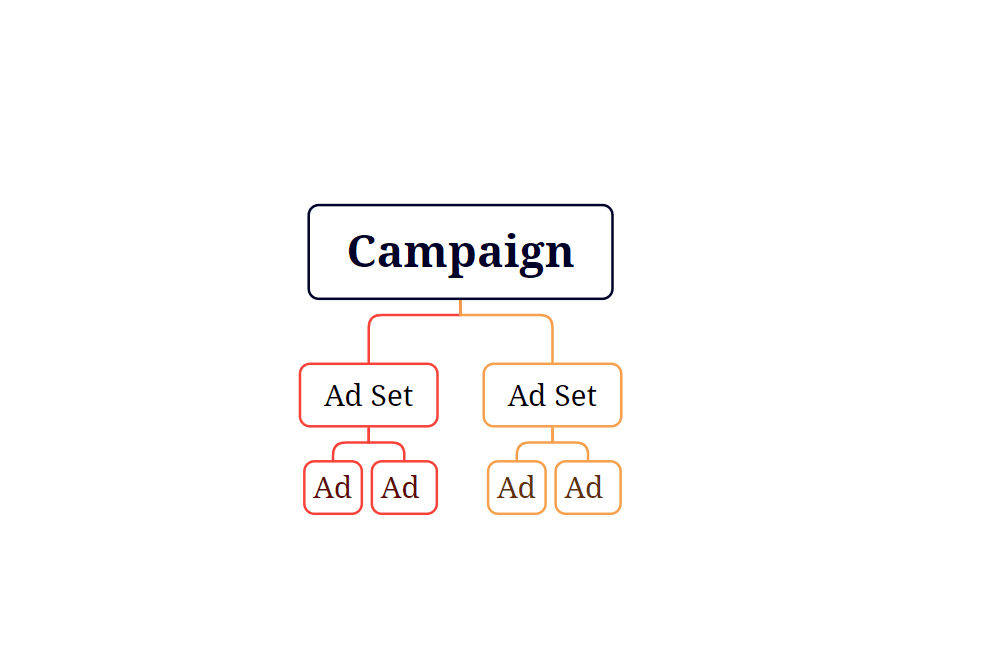
When creating Facebook ads, it’s important to understand the three-part structure: Campaign, Ad Set, and Ad. Each part plays a specific role in getting your ad up and running. I’ll break it down so you can easily follow along and create your first Facebook ad campaign.
Understanding Facebook Ad Structure
Before we dive in, let’s get familiar with the structure of a Facebook ad campaign:

- Campaign: This is where you set your main objective (what you want to achieve).
- Ad Set: This is where you decide who sees your ad (your audience), how much you’ll spend (budget), and where the ad will appear (placement).
- Ad: This is the creative part, where you design what the ad looks like, including text, images, and links.
Now that you know the structure, let’s walk through the steps to create a campaign.
Step 1: Open Facebook Ads Manager

To start, go to Facebook Ads Manager by visiting adsmanager.facebook.com. You can also access it through Meta Business Suite or by using the Ads Manager App.
Step 2: Click the Green “Create” Button
Once you’re inside Ads Manager, click the green Create button to begin setting up your campaign.
Campaign Level
Step 3: Choose Your Campaign Objective
The first step at the Campaign level is to pick your Objective — this is what you want your ad to achieve. Facebook offers different objectives, like:

- Awareness: If you want people to learn about your brand.
- Traffic: If you want to send people to your website or app.
- Engagement: If you want people to like, comment, or share your posts.
- Leads: If you want to collect contact information.
- Conversions: If you want to drive specific actions, like purchases.
Choose the one that matches your goal.
Step 4: Decide on Advantage Campaign Budget
At the Campaign level, you also decide whether to turn on Advantage Campaign Budget. This feature automatically distributes your budget across different ad sets, depending on which one is performing best. You can choose to:
- Turn it on: Facebook will adjust the budget to maximize performance.
- Leave it off: You manually control the budget for each ad set later.
Now that your campaign is set, let’s move on to the next level.
Ad Set Level
The Ad Set level is where you define the details about your audience, budget, and placements.
In the Ad Set section, you’ll decide who will see your ad. This is crucial because targeting the right people increases the chances of success. You can define your audience based on:
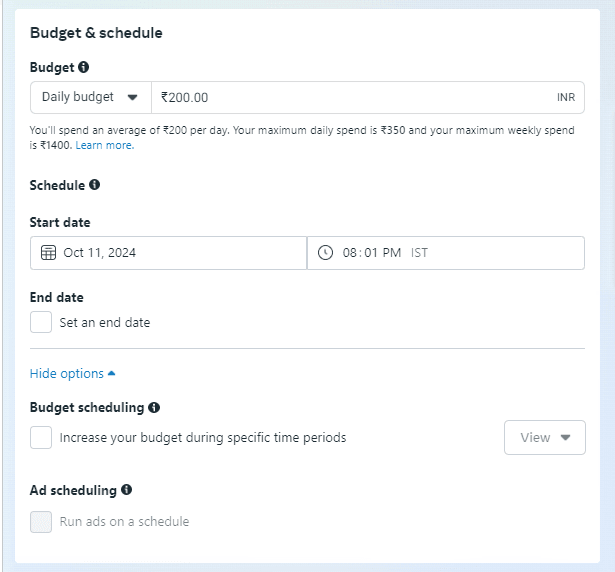
Step 5: Set Your Budget & Schedule
Now, set your Budget — how much money you want to spend on your ads. There are two types of budgets:

- Daily Budget: This is how much you spend each day.
- Lifetime Budget: This is how much you want to spend for the entire campaign.
You also choose when your ads will run by setting a start and end date, or you can let the ads run continuously until you manually stop them.
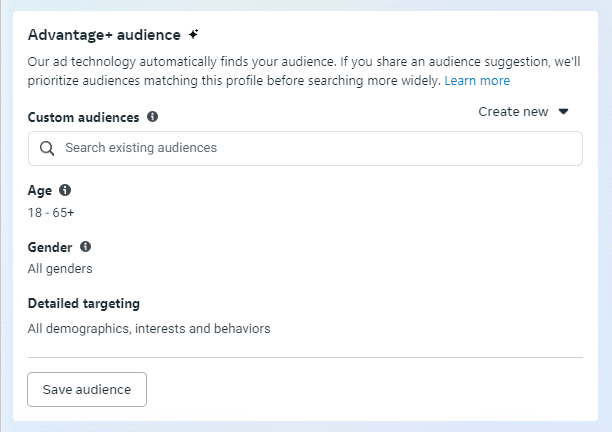
Step 6: Define Your Audience
At the Ad Set level, you can decide whether to turn on the Advantage+ audience. This feature automatically finds your audience. If you have an audience suggestion, Meta will prioritise the audiences matching the profile you gave.
You can also choose to create a custom audience by yourself, just define the followings:

- Location: You can target people in specific cities, countries, or even a radius around your business.
- Age: Choose the age group you want to reach.
- Gender: Select male, female, or both.
- Interests: You can target people who are interested in specific topics, like sports, music, or fashion.
Step 7: Choose Your Ad Placements
This is where you decide where your ads will appear. You can choose to let Facebook place them automatically or manually select the placements. Some options include:
- Facebook Feed
- Instagram Feed
- Facebook and Instagram Stories
- Messenger Ads
Once your audience, budget, and placements are set, you’re ready to create the actual ad!
Ad Level
This is the creative part of the process, where you design how your ad looks and what it says.
Step 8: Link Your Facebook Page and Instagram Account
At the Ad level, the first thing you do is select your Identity — the Facebook Page and/or Instagram account that will be linked to the ad. This ensures your ad shows up under your brand’s name.
Step 9: Create Your Ad (Text, Image, Video)

Now it’s time to create your ad! Here’s what you need to do:
- Ad Media: Choose between an image, video, carousel (multiple images), or slideshow.
- Primary Text: Write the main message of your ad — something that grabs attention and explains your offer.
- Headline: This is the bold text that appears below your image or video. Make it catchy!
- Call to Action (CTA): Choose what action you want people to take, like “Learn More,” “Shop Now,” or “Sign Up.”
Step 10: Set the Destination and Tracking
Lastly, decide where people will go after clicking your ad — this could be your website, app, or Facebook page. You can also set up tracking to measure the performance of your ad (like how many people visited your website or made a purchase).
Step 11: Review and Publish
Once you’ve set everything up, review your campaign, ad sets, and ads to make sure everything looks good. When you’re ready, click Publish. Facebook will review your ad, and once it’s approved, it will start running!
Conclusion
By understanding the structure of Facebook ads — Campaign, Ad Set, and Ad — you can easily create an effective ad campaign. It’s all about defining your goal, targeting the right people, and creating an eye-catching ad. Now that you know the steps, you’re ready to set up your own Facebook ad campaign and watch your business grow!